Gottlieb System 80 MPU Repair - Ready, Aim, Fire!
Author: Wayne Eggert
Date: 01/23/2011
Introduction
This is my first repair of a System 80 MPU board on a Gottlieb Ready, Aim, Fire!. There were only 390 Ready, Aim, Fire machines made.. and looking at the backglass and playfield art, is there really any wonder why? It looks pretty lame, very dated carnival theme and very much a kiddy theme. I was expecting the gameplay to be as lame as the art, but thankfully I was pleasantly surprised.
Problem Description
Battery corrosion -- enough said? It seems like 75% or more of the machines home owners put up for sale have some battery corrosion damage. The machines are bought working, played a ton by the family, then they just sit and no one ever thinks to replace or remove the batteries. Then one day they stop working and the home owner sells them as "lights turn on but that's it" or "switch broken" :) Anyway this System 80 MPU was not working at all, only the general illumination on the playfield came on. DataSentry Battery on Gottliebs
In the case of Gottlieb System 80 MPU boards, it's no wonder people didn't realize there was a battery on it. Gottlieb used "Data Sentry" batteries that were soldered directly to the board. Unless they were clearing leaking or causing damage, it's not very apparent that this was a actually a battery.
What's interesting is some of these System 80 boards still have their DataSentry battery and aren't leaking yet. Pretty amazing since these boards are nearly 30 years old! If you have a Gottlieb that still has its original DataSentry battery and it hasn't caused any damage yet, do yourself a favor and remove it immediately! It's only a matter of time before it starts leaking and ruins a perfectly good MPU board.
To remove the battery, you'll need a soldering iron (I used a 30 watt radio shack iron since the battery leads are rather large). The battery is soldered right up against the front of the cpu board, so you won't be able to cut it out (easily anyway) since there's no way to get to the leads under the battery. What I did was on the back of the board, heat up each of the solder leads while at the same time pulling the battery away from the front of the board (opposite the lead you're unsoldering). Keep working the solder points and you'll eventually have the entire battery removed with no problem.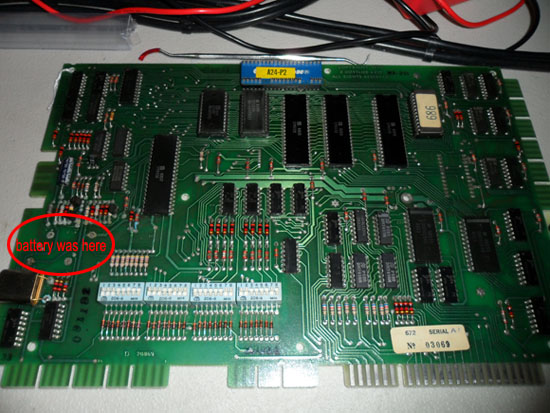
Picture: Ready, Aim, Fire MPU Board with the DataSentry battery removed
Here's a close-up of the corrosion. Lots of components to replace but none of the major ICs looked harmed on this board. Just some cheaper components -- crystal, capacitors, transistors, diodes and resistors.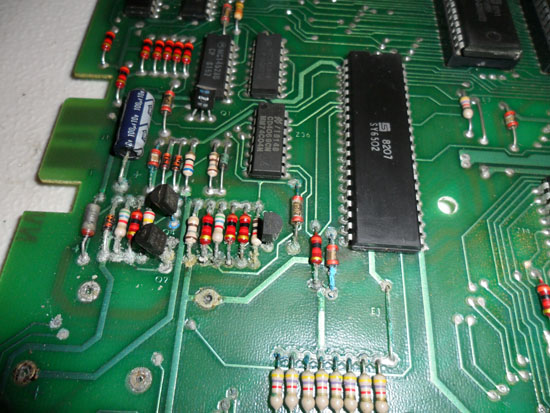
Picture: Close up of the corroded components
Resolution
After cutting off the offending battery on corroded boards, I usually make a list of all the comonents I'm going to need to replace & if I don't have all of the components already make an order to Jameco, Great Plains Electronics, eBay, etc. It helps a lot if you can find a component diagram of the MPU board and highlight the components that need to be replaced. You can then use that for reference when cutting off the components or when soldering. Taking a picture with a high resolution digital camera can also help if you don't have multiple boards compare to in case you forget where the components went or how they were oriented.
For this board I performed the following steps:
1. Cut off all of the corroded components, leaving the leads long enough to grab with pliers from the front of the board.
2. Wire brushed worst of the corrosion off the solder points / leads on the front of the board. This helps when removing each component so the corrosion doesn't act as an insulator.
3. Removed each lead by adding some solder to the solder point on the back of the board and then heating up the solder with the soldering iron while pulling the lead gently with pliers from the front of the board. Most of the leads came right out, but some of them needed to be scraped/sanded more or have additional solder added to the front and back so it flowed completey through the hole when heated.
4. Next I used fine grain sand paper over all
corroded traces and solder points to get rid of all the corrosion and
exposing the shiny copper on the traces / solder points. I then used a desoldering iron to remove solder from each of the holes. This
worked on 95% of the holes, but a few of the solder points needed to be heated with a
soldering iron while pushing a sewing needle through the hole to clear them.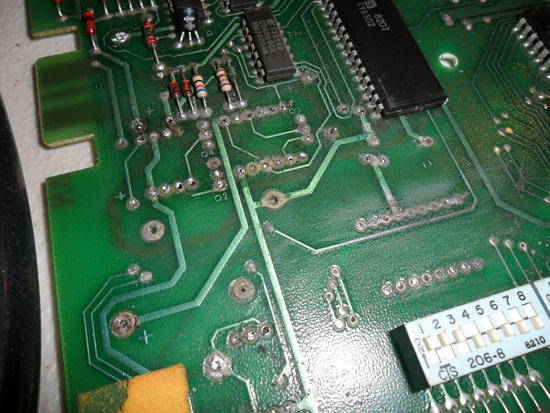
Picture: Leads removed, just started sanding the traces / solder points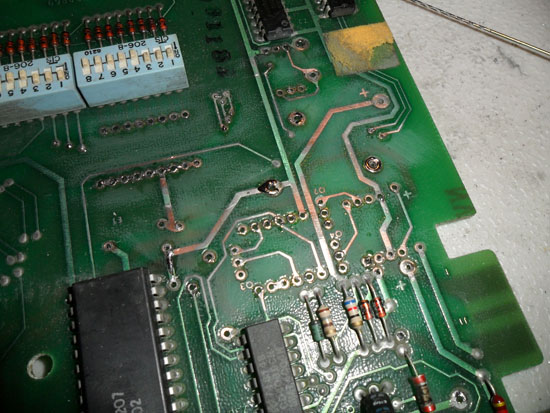
Picture: Holes cleared with a desoldering iron
5. I then used 91% isopropyl alcohol to initially clean up the board since there was a lot of corroded / metallic powder from the sanding/scraping. Then brushed white vinegar over the "corrosion zone". Followed by 91% isopropyl alcohol to clean the board.
6. Soldered in new components and wires for the remote battery pack so this never happens again!
7. Tested on a bench supply per Clay's System 80 CPU Board Repair page & the MPU seemed to be booting!
Here's the board with new components soldered in. It worked the first time I tried it out! Ready, Aim, Fire was up and running and althought here's some other gremlins to work out on the machine, the dead MPU was the biggest issue!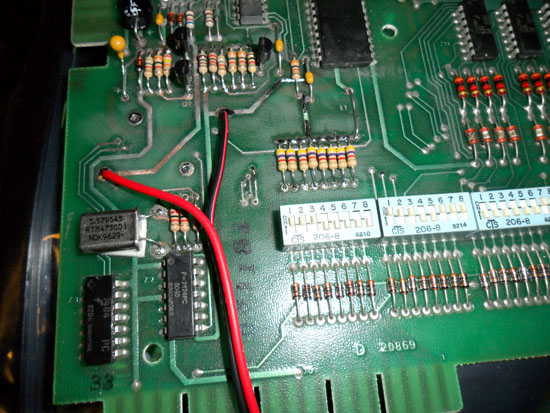
Picture: New components soldered in, board bench tested & ready to be re-installed!
What was really surprising is Ready, Aim, Fire! wasn't as lame of a game as I thought it would be. It has gun shots and sound effects for just about everything you hit on the playfield and there's actually an objective to what you hit on the playfield. It doesn't hold a candle to any of the newer machines, but it's neat bringing an old non-working machine back to life and being pleasently surprised. I still have other gremlins to work out of the machine, but it booted right up & started working as soon as I put the MPU board in and allowed me to see that the displays, sound board, power supply, etc all worked.
Comments:
| Re: Great post! |
| Posted 12/02/11 9:40AM by AceBHound |
| You could use a suitable replacement rechargeable battery but I used a remote battery pack with a diode installed (so the machine doesn't try to charge the batteries) and cheap alkaline batteries. |
| Great post! |
| Posted 11/07/11 4:51AM by Anonymous Techdoser |
| Did you use rechargeable batteries as replacement? |
