Playfield Touchup / Decaling - Williams Whirlwind
Author: Wayne Eggert
Date: 2/1/2011
Introduction
This particular repair didn't involve any electronics at all and was purely cosmetic. I bought a Williams Whirlwind pinball machine with some rather extensive playfield damage. I have yet to find pictures of a Whirlwind playfield with more damage than mine, not that I'm trying to win any awards there. I almost bought a nice condition used Whirlwind playfield off of eBay for about $300, but it would have been a great deal of work changing all of the playfield parts over to the "new" playfield. Instead I went the route of buying some decals & doing some touch-ups to my existing playfield. I can't say it was any less work than changing out a playfield, but I'm very happy with the results and it was a great learning experience.
Before Pictures
Here are some pictures of what the playfield started like when purchased. It was hard to tell the full extent of the playfield damage since the owner had the machine in the basement and the lights were dim. Funny how often that happens :) But the machine was cheap enough that if it had to be parted out we wouldn't have lost our shirts on it. Whirlwind was one of those games I've been looking for in practically any condition, though at this point I have a hard time paying $1500 for any single pinball machine and Whirlwind's in nice condition are priced around that.
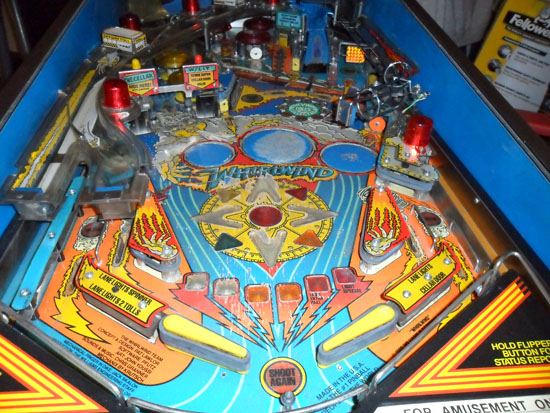
Picture: Full shot of playfield, notice some wear?

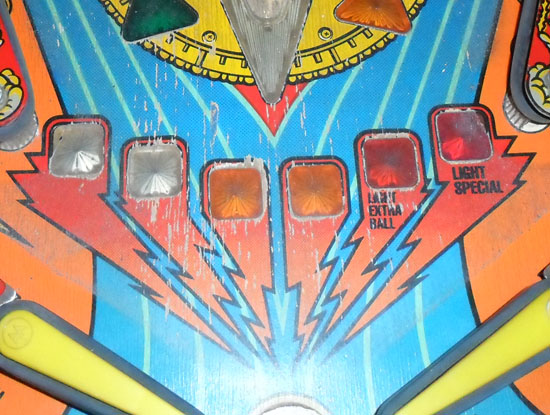
Picture: Practically all of the inserts on the bottom half of the playfield are missing their decals
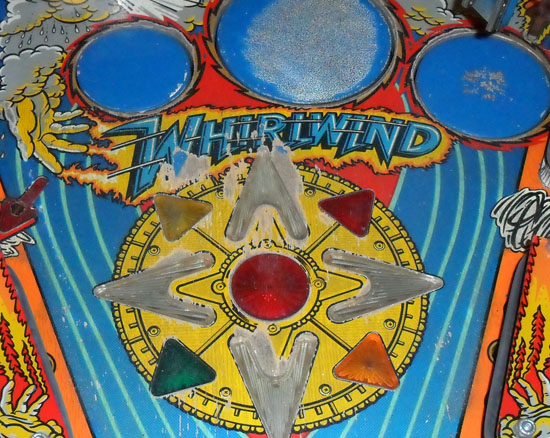
See those "spinners" above the Whirlwind text? Those shouldn't be all blue. Someone decided since they were so worn they'd look better if they were painted all blue. Fair enough, except for about $15 you can get some nice replacement decals and it probably would have been less work too. You can see where I used some isopropyl alcohol to peak under the paint to see just how worn the original textured decals were.
Picture: Playfield is worn through the ink in many areas, touched up slightly with dark blue paint
Obviously the playfield has seen better days. I don't know the full story behind this machine, however the previous owner had it for over 5 years and his kids played it A LOT. They told us they loved the machine and had many tournaments on it. The machine hadn't been cleaned since it was bought and although the top of the playfield is mylared and in pretty nice shape, the bottom of the playfield had its mylar removed at some point. This also explains why the insert decals on the bottom half are missing, as they most likely came off with the mylar when it was removed. My guess is whoever had the machine before this guy had removed the mylar and planned to either clearcoat or redo the mylar -- it probably looked a lot better than this before the kids played the heck out of it. Since the playfield wasn't cleaned, the balls and grit on it acted like sandpaper and did a number on the playfield.
Comments:
| Awesome Job! |
| Posted 06/30/13 9:51AM by Gamer1 |
| Incredible job on this restoration, I learned alot of practical information that I will put to use on future machines. Keep flippin! |
| Thanks |
| Posted 01/29/13 12:44PM by Anonymous Techdoser |
| Thanks for sharing this! I have a Diner with very similar wear on the lower p/f left side from this exact same issue. Has mylar up top, but shoddily pulled from the bottom. Having to replace all my decals on the lower p/f including the big Diner and People, but luckily was able to find some reverse printed mylar coated decals for all that. I will be doing acrylic touch up though on that lower left side which has paint cracks similar to yours. |
| how to use the reset buttons |
| Posted 12/31/12 3:55AM by Anonymous Techdoser |
|
Hi, I have a Whirlwind and can not find anything on the internet to show me how to use the 3 buttons on the inside to get the game to start... I can go through the menu but cant do anything else.. Please email me at it65@live.com Thanks |
| Acrylic paint |
| Posted 09/19/12 7:07AM by Anonymous Techdoser |
| Which acrylic paint colors did you use exactly? My whirlwind is in much the same condition as yours was |
| N1 |
| Posted 03/03/12 5:50AM by Anonymous Techdoser |
| Wow this is the most damage Whirlwind ive seen indeed. Bit nice job man, a machine like this deserves this :) Im also repairing one but luckely my playfield was protected with mylars. |
